Android5.0通知变化浅析
目前在 Android 中通知的使用还是很常见的,为了做版本兼容,常用兼容包 NotificationCompat.Builder 和 Notification.Builder。
- NotificationCompat.Builder 位于 v4 扩展包内(version 4 Support Library)
- Notification.Builder 在 Android 3.0 开始引入 (API level 11). 最近在 Android5.0 设备上发现一个问题:通知图标突然变成了白色的方块而不是代码中设置的 icon。 问题原因 细读开发者文档其实也可以发现一些线索,虽然笔者是直接查的源码发现的问题原因。http://developer.android.com/design/patterns/notifications.html 一文的 Use distinct icons 部分介绍了几点关于通知的建议,其中的有两点是建议开发者不要做的行为。
Don’t Place any additional alpha (dimming or fading) into your small icons and action icons; they can have anti-aliased edges, but because Android uses these icons as masks (that is, only the alpha channel is used), the image should generally be drawn at full opacity.
Don’t Use color to distinguish your app from others. Notification icons should only be a white-on-transparent background image. 简单的说就是 5.0 后 Android 官方建议不要为通知的图标添加任何额外的透明度,渐变色,不要企图用颜色将通知图标与其他应用,比如系统应用,应用的通知图标只能是在透明的背景上有白色的图案。 至于原因,文档并没有细说,只是提到 5.0 系统将会在底层处理图标,想知怎么处理的可以参考 Android SDK API level 21 后的 Notificaiton 源码,里面写的较详细。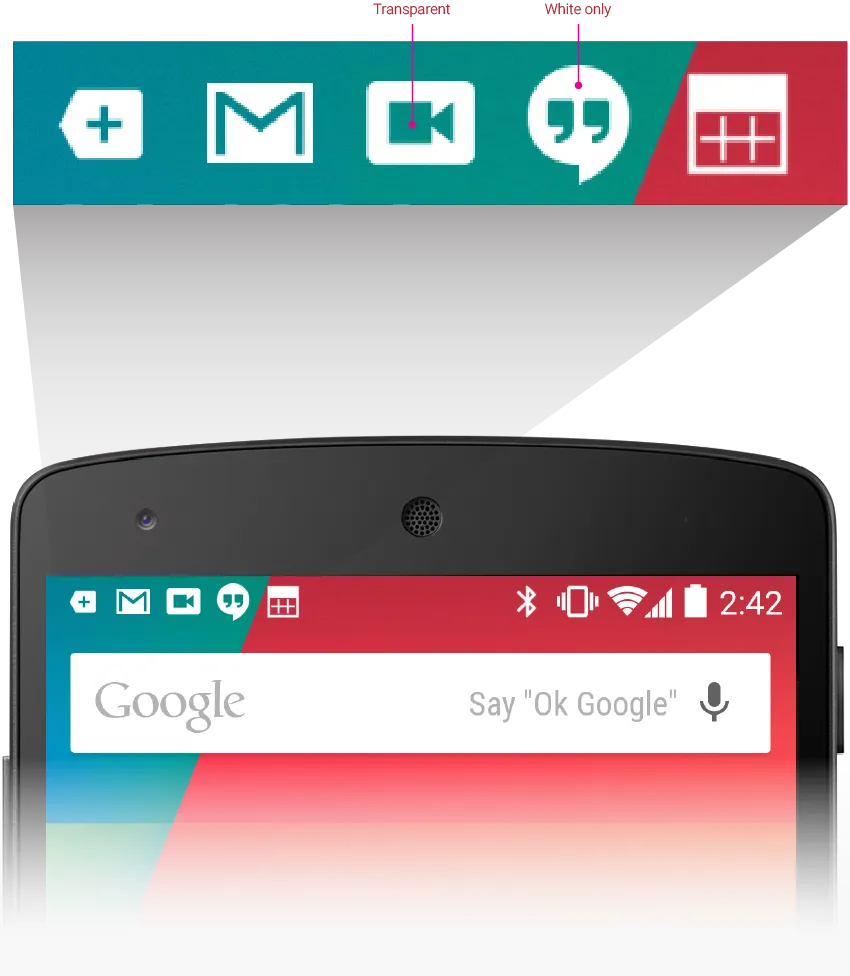
结合文档提供的图片示例,应该可以理解。 如果不遵循建议那么有很大几率是会出上文提到问题的,为什么不是别然出问题呢? 这还依赖于代码编译的版本,根据尝试,目前 api 21 以后编译会出问题,20 及以前的版本编译不会出问题。所以解决问题比较简单粗暴的方案是用 20 及更早的版本编译代码。但是要测底解决问题,还是得遵循文档指导,及从新设计通知的图标以符合要求。 源码分析 下面看一下到底 21 的 Android 源码里面做了什么操作会导致通知的图标统统变白色。 Notification.java
private RemoteViews applyStandardTemplate(int resId, boolean hasProgress) {
  //...
  if (mLargeIcon != null) {
         contentView.setImageViewBitmap(R.id.icon, mLargeIcon);
         processLargeLegacyIcon(mLargeIcon, contentView);
         contentView.setImageViewResource(R.id.right_icon, mSmallIcon);
         contentView.setViewVisibility(R.id.right_icon, View.VISIBLE);
         processSmallRightIcon(mSmallIcon, contentView);
     } else { // small icon at left
         contentView.setImageViewResource(R.id.icon, mSmallIcon);
         contentView.setViewVisibility(R.id.icon, View.VISIBLE);
         processSmallIconAsLarge(mSmallIcon, contentView);
    }
    //...
}
 /**
         * Recolor small icons when used in the R.id.right_icon slot.
         */
        private void processSmallRightIcon(int smallIconDrawableId,
                RemoteViews contentView) {
            if (!isLegacy() || mColorUtil.isGrayscaleIcon(mContext, smallIconDrawableId)) {
                contentView.setDrawableParameters(R.id.right_icon, false, -1,
                        0xFFFFFFFF,
                        PorterDuff.Mode.SRC_ATOP, -1);
                contentView.setInt(R.id.right_icon,
                        "setBackgroundResource",
                        R.drawable.notification_icon_legacy_bg);
                contentView.setDrawableParameters(
                        R.id.right_icon,
                        true,
                        -1,
                        resolveColor(),
                        PorterDuff.Mode.SRC_ATOP,
                        -1);
            }
        }
这里我截取了两段比较关键的代码,在用 NotificationCompat.Builder 实例化我们的通知后,最终需要将各种图标,参数配置,应用到通知视图上面。可以看到如果我们只设置 smallIcon 而不设置 largeIcon 也是可以的,此时直接将 small 作为大图标设置给左侧的 id 为 R.id.icon 的 ImageView。要注意的事一般情况下都不可以不设置 smallIcon,否则通知无法正常显示出来。 processSmallIconAsLarge 方法里面负责将我们设置的 smallIcon 二次处理,也就是这里会改变我们最终看到的通知图标,包括顶部状态栏和下拉显示的小图标。 参考 http://developer.android.com/design/patterns/notifications.html http://developer.android.com/guide/topics/ui/notifiers/notifications.html